Using EstateExec Tables
Show Table of ContentsBy default, EstateExec tables list their content in natural order (e.g., chronological for transactions, alphabetical for assets, by time period for tasks, etc.).
You can define new table entries at any time, and although a newly created entry will typically be displayed at the top of the table (so you can easily find it), the next time you display the table it will be sorted into its natural order. Of course, you can dynamically rearrange a table whenever you like, sorting by one or more columns.
Core Capabilities
EstateExec tables are quite powerful, and have a plethora of additional capabilities, including row filtering, column auto-fit, PDF export, and more. Don't worry, you don't need to know most of this: just remember there are a lot of capabilities available in case you later have something special you want to accomplish:
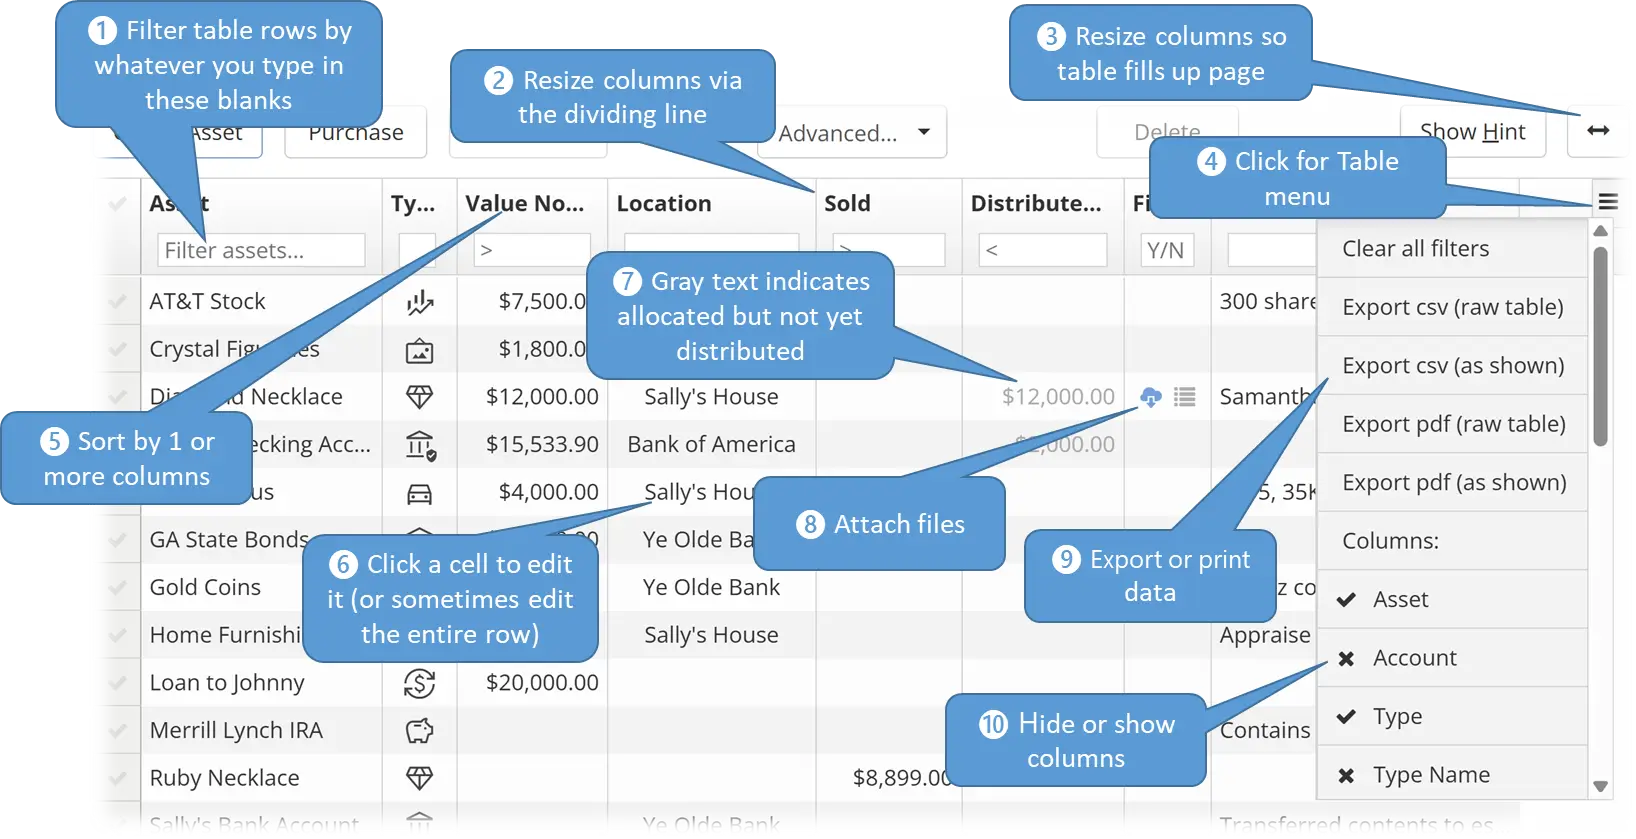
- Filter — Typing values in these header cells will cause the table to show only qualifying rows.
- Resize — Drag the divider to resize column widths.
- Column Auto-Fit — After resizing columns, you may find that the table no longer fills the entire page. Clicking this button will expand/shrink the columns proportionately to relink it to the width of the page.
- Menu — Brings up the standard table menu (as shown).
- Sort — Click a column header once to sort the table by that column, click again for reverse sort, and click a third time to return to the default table arrangement. You can also sort by multiple columns: just shift-click a column header to add it to the sort.
- Edit — Click a cell to edit its value (or the contents of the entire row).
- Gray Text — Gray text for distributed asset value indicates that the asset has been allocated for distribution, but that the distribution has not yet occurred.
- Attach Files — You can attach files to almost any item.
- Export or Print — You can export PDF files (for printing) or CSV files (for Excel, etc.).
- Hide Columns — Click a column name in the table menu to hide it; click it again to show it.
Additional Data
Not everything is shown in the tables by default – that would be overwhelming!
Date Ranges
Tables that contain dated elements (such as Cashflow) only show the most recent entries by default. To include older entries in the table, click the "Show More" button below the last entry in the table (you can keep clicking to go as far back as you want).
You can also use the View | Date Ranges menu to display:
- Recent: Just the most recent items (or more if you have retrieved them)
- Range: Just items within a specified a date range (e.g., 01-Jan-2025 to 23-May-2026)
- All: All items, regardless of date
Be aware that table filters, summary statistics, and exports only use what is present locally in the table.
File Attachments
Most tables have a Files column which makes it easy to attach and download files related to a given item. You can attach images, documents, spreadsheets: whatever you want (see Attach Files).
Additional Table Columns
Not all columns are shown by default. To see additional pre-defined columns, you can use the table menu to pick and choose which columns to display.
Tagging
People sometimes ask about creating new item categories or even entire new table columns, but it's important to remember that the mission is not to do an amazing job of cataloging the estate, the mission is to settle the estate... EASILY. While a professional organizer might enjoy adding even more details, everything in EstateExec is there because it is needed for estate settlement in one jurisdiction or another. That said, rather than adding new categories or columns, you can always "tag" your entries to support whatever you want – just enter the information in the Tags field (hidden by default), and you can then filter the table by that column to show just the entries that match that keyword. This is actually quite powerful, because with this technique you don't have to classify an item into just one category: you can "tag" it with multiple categories (e.g., "watercolor painting" and "framed painting").